Easily Propagate Orchids in 5 Steps for Year-Round Blooms and Beauty!
Easily Propagate Orchids for Year-Round Blooms and Beauty
- Introduction
- Understanding Your Orchid Type
- Propagation Methods for Orchids
- Care After Propagation
- Common Mistakes to Avoid
- FAQ
Introduction
Imagine your home filled with the vibrant colors and delicate fragrances of blooming orchids. However, as beautiful as these plants are, many enthusiasts find themselves struggling to keep them alive, let alone propagate them. The good news is that, with the right approach and care, you can not only maintain these stunning plants but also create new ones. Understanding the propagation process can help you enjoy even more blooms throughout the year. Let’s dive deeper into how to effectively propagate your orchids.
Understanding Your Orchid Type
Before you start the propagation process, it’s crucial to know what type of orchid you have. Different species have unique needs and growth patterns. Here’s a brief overview:
- Phalaenopsis: Commonly known as moth orchids, these are popular and beginner-friendly.
- Cattleya: Known for large, fragrant flowers, they often require more light.
- Dendrobium: These can adapt to a variety of conditions but need consistent watering.
- Vanda: Known for their vibrant colors, these orchids prefer warm, humid conditions.
Assess the type you have to tailor your propagation method accordingly. Understanding its characteristics, such as light and water requirements, will enhance your chances of success.
1. Assessing Growth Conditions
Check your orchid’s current living conditions, including light exposure, temperature, and humidity. This preparation is essential to create an ideal environment for your new plants.
2. Researching Care Needs
Each orchid type has specific care needs. Use reputable gardening books or online sources to gather necessary information tailored to your orchid species.
Propagation Methods for Orchids
There are several effective methods to propagate orchids. While the process may seem daunting, following these steps can lead you to success.
1. Division
This technique is suitable for orchids that have multiple stems. Here’s a simple step-by-step process:
- Choose: Select a healthy parent plant.
- Remove: Carefully take the plant from the pot.
- Divide: Separate the root system into sections, ensuring each has a few stems and healthy roots.
- Re-pot: Place each section in a fresh pot with suitable orchid mix.
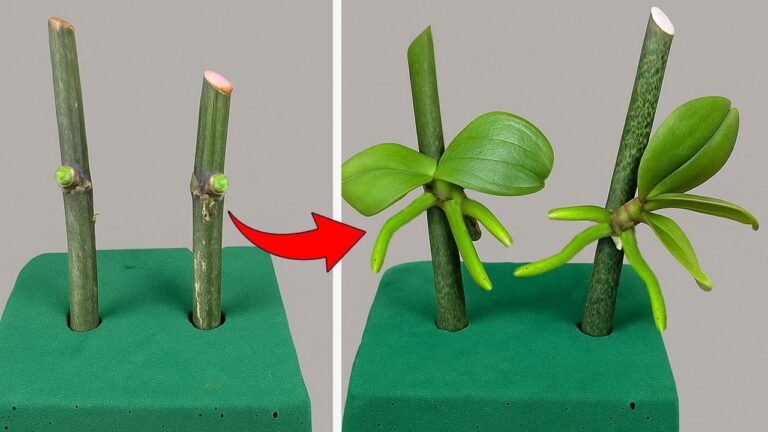
2. Keiki Production
Keikis are small plantlets that develop on the flower spike. Here’s how to encourage and propagate them:
- Identify: Look for a keiki on the spike of a healthy orchid.
- Cut: When the keiki has at least two roots, gently cut it from the parent plant.
- Pot: Place it in a small pot with bark or sphagnum moss.
3. Seed Propagation
While more complex, seed propagation can also yield beautiful results. This method requires sterile conditions and patience:
- Harvest: Collect the seeds from mature seed pods.
- Prepare: Use agar gel as a growing medium.
- Plant: Sprinkle seeds onto the surface of the gel and seal them in a suitable container.
Care After Propagation
Once you’ve propagated your orchids, proper care is crucial to help them thrive. Follow these guidelines:
1. Watering Regimen
Be careful not to overwater your new plants. Keep the medium slightly moist, allowing for air circulation around the roots.
2. Light Requirements
Ensure your propagated orchids receive indirect sunlight. Too much direct light can scorch their leaves.
3. Fertilization Schedule
After a month, begin using a diluted orchid fertilizer. Follow a quarterly schedule to ensure your plants receive the nutrients they need.
Common Mistakes to Avoid
Many first-time propagators encounter a series of pitfalls. Here are some common mistakes and how to avoid them:
- Overwatering: This is one of the most frequent issues. Always allow the medium to dry slightly before watering again.
- Insufficient Light: Ensure your orchids receive adequate but indirect sunlight for healthy growth.
- Ignoring Temperature: Maintain a stable temperature suitable for your specific orchid type.
- Neglecting Hygiene: Always use clean tools to prevent bacteria or fungi from infecting your plants.
FAQ
How long does it take for orchids to grow after propagation?
Orchids can take several months to establish themselves after propagation, with some types blooming within a year.
Can I propagate orchids during any season?
While you can propagate orchids year-round, spring and early summer are usually the best times for most species.
What should I do if my propagated orchid wilts?
If your propagated orchid wilts, check for proper watering and light conditions. It may also need repotting if the roots are restricted.
Conclusion
By understanding the propagation methods and nuances of caring for your orchids, you can enjoy a lush display of blooms year-round. What type of orchid are you planning to propagate in your home? Your thoughts could inspire others in the community.